Pages

8.31.2011

Review: Dior's Dior Addict Lipstick in "#586 L.A." {Swatches and Photos}

Hey guys! This is a review on one of my newest lipsticks, Dior Addict Lipstick in "#586 L.A." Keep reading for a full review, pictures, and swatches of this lovely product.

The flash washed the brightness of this beautiful lipstick!! It has a lot more of a fuchsia undertone to it. 


Dior Addict Lipstick #586 L.A.
Net Weight: 0.12 OZ
Company: Dior
Where to buy: Sephora, Nordstroms
Price: $28.00

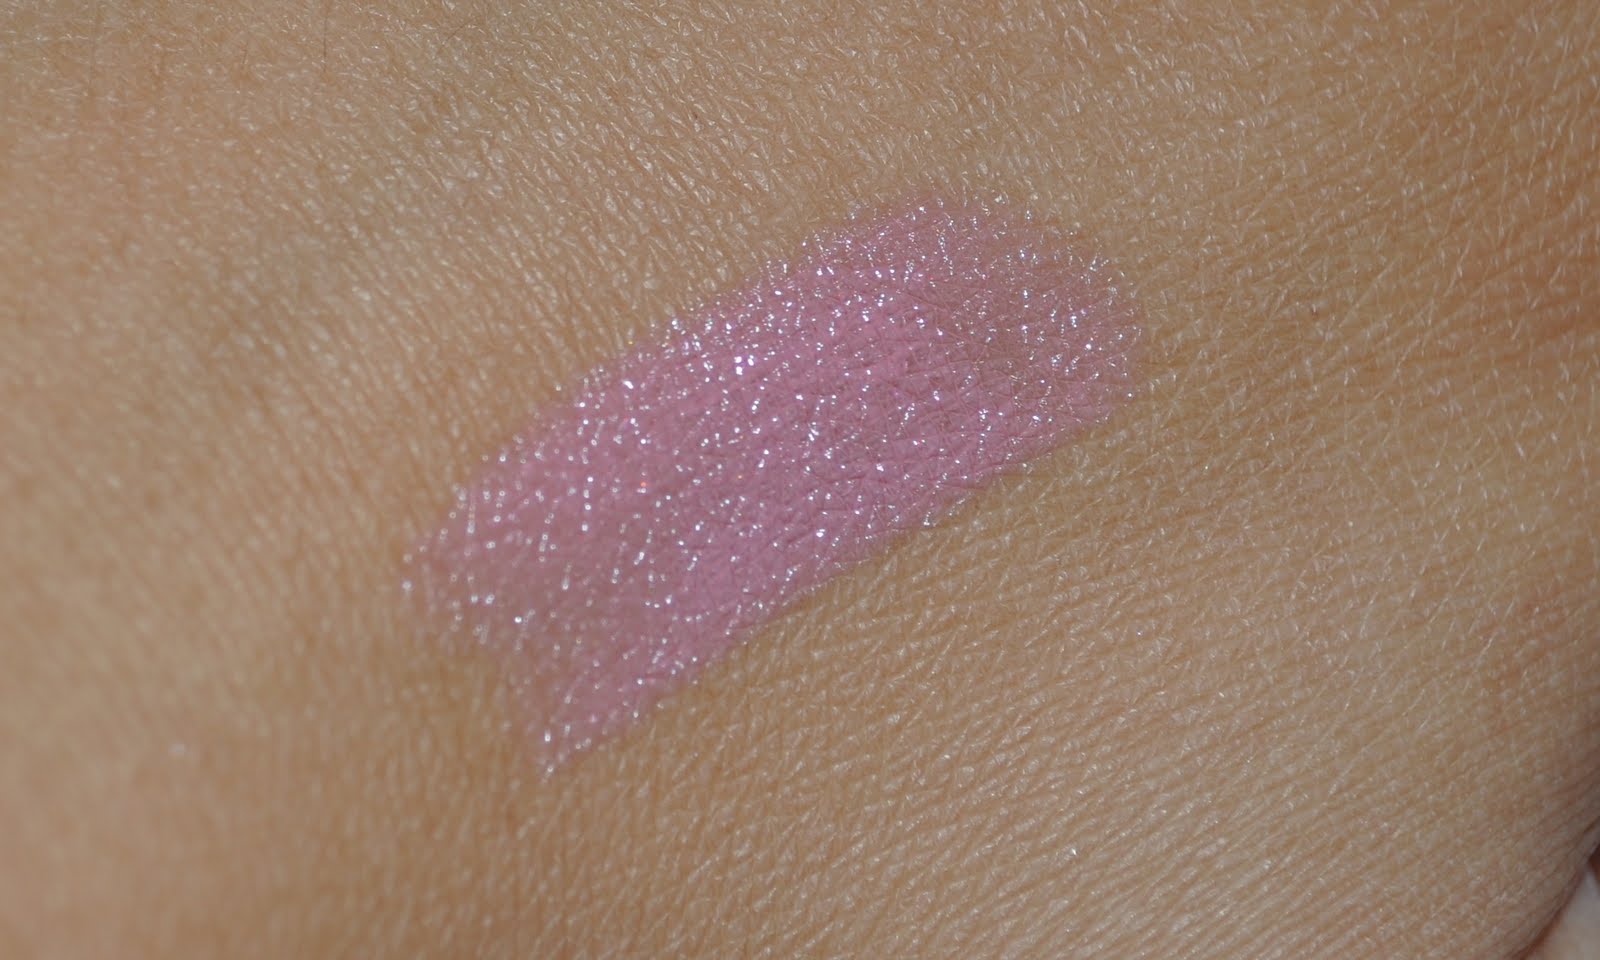
Formula: This lipstick is so smooth! The application is very even. It is extremely moisturizing and has a glossy finish. It isn't as moisturizing as the Chanel Coco Rouge Lipsticks, but it is still great. I love this shade in particular. This is one of those lipsticks that is "your lip color but better." It is a neutral pink that can be built up to a magenta color. The glossiness adds a natural "glistening" to your lips that looks gorgeous. It is quite sheer when first applied but after a few layers it has nice pigmentation. Pretty good formula overall!
Packaging: I am OBSESSED with this packaging! It is kind of bulky and does not fit into a normal lipstick holder, but it is so unique and cool. The outer casing is a lot bigger than the actual tube of lipstick. I do feel like I am paying for the packaging which slightly bothers me. I still like the idea of this case and not too badly affected by it.
Longevity: The longevity is not impressive. Although the color makes my lips look beautiful (HA), I find myself constantly reapplying it. The actual color lasts on my lips, but the shine it gives wears off within an hour. That is basically the only down side of this lipstick though.


I hope you guys thought this review was helpful! Thank you so much for reading and don't forget to follow! Love you guys!

ENTER MY GIVEAWAY: http://dreamingofbeautyx.blogspot.com/2011/08/giveaway-time-100-followers-nyx.html

8.30.2011

"Matte Smokey Eyes" - An Eyeshadow Tutorial

Hey readers. This is a lovely all matte smokey eye tutorial! I chose to do an all matte eyeshadow tutorial to switch things up. This is a toned down version of a smokey eye. Using only matte colors gives a sultry look to the eye that is beautiful and fun! I prefer matte smokey eyes because the shimmer does not contradict the deep tones of the eyeshadow. Keep reading if you want to learn how to recreate this look! :)


Products Used:
-Urban Decay Primer Potion
-Inglot Matte Eyeshadows in "#339" and "#391"
-NYX Jumbo Pencil in "Milk"
-Covergirl Lashblast Volume in "Black"
-Dura Lash By Ardell: "Flare Short Black Individual False Eyelashes"
Directions:
Step 1: Apply your primer all over your lid and up to your brow bone.
Step 2: Take your NYX Jumbo Pencil or any matte white base and apply it to your brow bone and inner corner. You can set it with a matte white eyeshadow if you wish for a better longevity.
Step 3: With a flat shader brush, pack the light gray onto your lid.
Step 4: With a dense crease brush, pack the black onto your outer third and first third of your crease. Follow the shape of your eye with the black eyeshadow and extend it slightly for a cat eye effect. This will intensify the look of your eyes!
Step 5: Blend the eyeshadow edges slightly.
Step 6: Curl your lashes and apply mascara. Then apply individual lashes to your outer corner area. This will work with your black eyeshadow to extend your eye into a cat shape.


Hope you liked this tutorial! Please comment below what you think and follow this blog! Thank you so much for reading. Love you guys!

ENTER MY GIVEAWAY- http://dreamingofbeautyx.blogspot.com/2011/08/giveaway-time-100-followers-nyx.html

8.29.2011

"The Body Shop"

I recently finished my Clean And Clear SPLASH Body Wash and was desperate for something new. I considered going to Bath and Body Works but I am honestly getting tired of that place. I am obsessed with The Body Shop's body butters so I decided to try to find a body wash there! I like a lot of their scents too. Here are two things I found that I really like!


Pink Grapefruit Shower Gel ($15)
Mango Hand Wash ($8)

I got the giant size for the body wash and I really needed another hand wash backup! The Body Shop is having a promotion where it's "Buy 1 Get 1 %50 off" or "Buy 2 Get 1 Free." The grapefruit wash has an EXTREMELY potent smell of fresh grapefruit. It is very intense and citrus-y so if you do not care for citrus scents DO NOT BUY THIS! The mango hand wash is lovely and very easy to stomach so I would recommend it to anyone! Anyways, I am satisfied with what I got and can't wait to use them up! Thank you so much for reading! Please follow :)

ENTER MY GIVEAWAY!

8.28.2011

FALL 2011 Nail Polish Favorites {Part 2}

Hey lovlies! :)

This is the second part to my fall nail polish favorites! These are a few colors that I think are trending right now. I don't own a few staple colors but I list a some alternatives down below. Keep reading for swatches below! Thanks for reading <3


Sephora By OPI's "Break A Leg Warmer"

OPI's "Fancy Fuchsia" 

Chanel's "Graphite"
Thanks for reading! I hope you enjoyed this and found it helpful. I know that I am lacking a taupe and a plum color! I do not own any. Taupe and plum nail polishes are amazing for the fall. I would recommend Essie's "Glamour Purse" and Sally Hansen's Complete Salon Manicure in "Plums The Word." A nice red is good too!

If you liked this post please comment and follow! Love you guys!!!!!

ENTER MY GIVEAWAY!:
http://dreamingofbeautyx.blogspot.com/2011/08/giveaway-time-100-followers-nyx.html

8.26.2011

DIY: Moisturizing Yogurt and Orange Mask

Hello guys! Back with another DIY post! This mask made of yogurt and orange will provide your skin with moisture and a kick of refreshment! The nourishing fatty acids and vitamin D in the yogurt will treat your skin well. Orange is filled with Vitamin C and plenty of AHA's which will give your skin a brightening kick. Keep reading on how to complete this DIY!


What You Need:
- 1 cup of plain yogurt (Greek yogurt great too!)
- 1/4 cup of fresh orange juice
- 1/2 tbsp of honey

Directions:
Get a medium sized bowl and put your ingredient in. Use your fingers or a spoon to mix well. Apply to your face and let the mask soak in for 5-10 minutes. Rinse off with some warm water and you are finished!

Even though this was extremely simple and quick, I hope you enjoyed this post! Please follow and comment below! Thank you so much for reading. Love you! <3

ENTER MY GIVEAWAY: http://dreamingofbeautyx.blogspot.com/2011/08/giveaway-time-100-followers-nyx.html

8.25.2011

"Golden Eyes"-An Eyeshadow Tutorial


Hi everyone! Another eyeshadow tutorial, woohoo! This is inspired by the whole fall military trend. I took a gold base and paired it with an olive taupe color. It created a beautiful and bright eyed look! Keep reading for directions and product information! Thanks guys <3

Products Used:
-Stila Smudge Stick Waterproof Eye Liner in "Koi"
-Inglot Matte Eyeshadow in #360
-Urban Decay Eyeshadow in "Half Baked"
-Urban Decay Primer Potion
-One By One Volum' Express Mascara

Directions:
Step 1: Apply your base/primer. This will help the colors appear more pigmented, as well as increase the longevity. Blend all over your eye and on your lower lash line.
Step 2: Take your gold base and apply it all over your lid. I used a golden Stila Eyeliner, but a NYX Jumbo Pencil or any gold cream eyeshadow would work. Blend the edges with your finger. Take it onto your waterline and lower lash line as well.
Step 3: To set the eyeliner and prevent creasing, apply a gold powder eyeshadow over it. I used Urban Decay's "Half Baked." It has a velvet smooth texture and is the perfect golden color.
Step 4:  Take your matte taupe and apply it to your crease and outer third. This will add depth to your eye! Blend all of the edges. Blend lightly onto your lower lash line.
Step 5: Curl your lashes and apply mascara to your upper and lower lashes. Finished!

I hope you loved this eye tutorial! I think golden eyes look amazing on medium skin tones so try this out if you have a killer tan from summer vacation! Please follow and comment telling me what you think! Thank you so much for taking the time to read this tutorial. Bye guys! <3

Preview: Fashion FALL Lookbook 2011

Hey...just a sneak preview of my fall lookbook! It's in black and white so you don't know the exact colors of the clothing! It gives you a reason to follow and stay tuned for the full fledged lookbook :)

In this preview, I shot at one of the worst times so the shadows and lighting is quite uneven. Sorry! The actual lookbook will be somewhat nicer, I promise! Enjoy :)


Within the next couple of weeks this full post will be up! Thanks for reading guys love you all!

8.23.2011

FALL 2011 Nail Polish Favorites {Part 1}

Hey guys! Fall is right around the corner so I thought I would post some of my favorite fall nail polishes! I love a lot of deep, subtle colors. Fall is one of my favorite seasons so I thought it would be awesome to do this post. It is a total coincidence that these nail polishes are all Essie! In part two of this post there will be more variety. Enjoy! <3

Fall Nail Polish Picks

Essie's "Masquerade Belle"

Essie's "Sand Tropez"

Essie's "Buy Me A Cameo"


I hope you enjoyed this post! Please don't forget to follow! Leave a comment listing your favorite fall nail polishes and I will maybe give them a try! Thank you so much for reading and enjoy your day. Love you guys! 

ENTER MY GIVEAWAY! : I'm doing a NYX giveaway so feel free to enter in! It is super simple! Click below to see what you can win for FREE and how you can enter!

http://dreamingofbeautyx.blogspot.com/2011/08/giveaway-time-100-followers-nyx.html

8.22.2011

Review: Revlon Illuminance Creme Shadow Quad in "#710 Not Just Nudes" {Swatches and Pictures}

Hi! This is a review on a very popular cream eyeshadow quad by Revlon. It is called the "Revlon Illuminance Creme Shadow Quad in " #710 Not Just Nudes." Keep reading for a full review, pictures, and swatches!

"Revlon Illuminance Creme Shadow Quad in "Not Just Nudes"
Net Weight: 0.12 OZ
Company: Revlon
Where to buy: CVS, Target, Ulta
Price: $5-7


Product: What I love about this palette is that there are two matte and two shimmer shades. I cannot stand when a quad has only shimmery shades because of the lack of variety! An eye look with only shimmery shades does not appeal to me. I like to combine matte and shimmery eyeshadows to create a look that flows. The color pick of this quad is spot on and perfect. 
Formula: These are some of the creamiest eyeshadows I have ever tested! The pigmentation is excellent! Once they are dry, they do not budge. Sometimes the application is uneven. It is a lot harder to touch up cream shadow without smudging the others so this is sometimes an issue. 
Packaging: The actual look of the compact is nothing special, but I love that there is a compact mirror inside. Having a mirror makes it easy to apply makeup if you are in a hurry or not in your home. The packaging is sealed tight so the eyeshadow quad will not dry out over time. 
Longevity: The longevity is okay. I use my Urban Decay Primer Potion and it will be creased and worn off by the end of the day unlike other powder eyeshadows. These are pretty great in comparison to other cream eyeshadows though. With a powder eyeshadow set of this product, it will stay put. 

Photos And Swatches


Thank you so much for reading! If you have any suggestions or posts you would like me to do, please comment down below! Don't forget to follow! Love you guys <3

GIVEAWAY HERE! CLICK THIS LINK TO ENTER TO WIN SOME NYX PRODUCTS
http://dreamingofbeautyx.blogspot.com/2011/08/giveaway-time-100-followers-nyx.html

8.21.2011

5 Ways To Have A Longer-Lasting/Better Manicure!

Hi readers! Ever get annoyed when your perfect manicure chips after two days? Or when your nails are a nasty shade of yellow after you have taken off your polish? Keep reading for 5 techniques that will help prevent issues and increase longevity of your nail polish application!

#1: Buffing Your Nails
Plenty of people skip the step of buffing their nails when giving themselves a manicure, but they do not know the difference it can make! There is a layer of surface nail that is super smooth which makes the nail polish harder to stick too. By buffing your nails, you can create a rougher and "stickier" surface for your base coat or nail polish to stick to. A nail buffer is not too expensive, usually running under $5. Buy one if you do not paint your nails frequently, but you want a longer lasting manicure!
#2: Swipe An Extra Layer Of Acetone Right Before You Apply Your Polish
If you are treating your nails or applying a cuticle oil, a residue can form on your nails, causing your nail polish to slide off and have a less longevity time. It you recently applied a hand lotion or any moisturizing product of some sort, the same effects can occur. By swiping some nail polish remover or pure acetone over your nails right before painting, you can make a better base for your nail polish to be painted on so there are no extra oils. 
#3: Base Coats!
Plenty of people think base coats are a waste of money, but they are extremely important! Certain nail polishes cause nail stains and discoloration. A base coat is there not only to help the lasting time of the nail polish, but it PROTECTS your nails! The state of your natural nail is extremely important! There are all sorts of base coats for different purposes which make this product a must! (ex: strengthening, growth enhancement, longevity)
#4: Dip Your Nails In Ice Water
After painting your nails, try dipping your handing in a chilly bowl of ice water! This trick dries your manicure a lot quicker and hardens all of the components in the polish. It also sets and solidifies the lacquer to prevent smudges! 
#5: UV Light
This is one of the best ways to harden the nail laquer, which gives a strong finish for a long lasting manicure. BUT BEWARE, the NY Times wrote an article about the radiation give off from these UV lights. It can be quite dangerous even if the radiation is at a small level. Use at your own risk!


If you thought this post was helpful, follow this blog! Thank you so much for taking the time to read this post! If you have any requests or other techniques for your manicure, tell me in the comments below! I love feedback! 

REMINDER: Currently doing a NYX giveaway! Please enter!


8.18.2011

GIVEAWAY TIME (100 followers NYX Giveaway!) {Closed}

Giveaway Time!!!! This giveaway was promised if I reached 100 followers by the end of summer! I want to thank you guys so much for supporting this blog! I hope that you find every single post helpful and beneficial. I love constantly posting and researching tips and products for you guys! Anyways, back to the fun stuff. This is a NYX giveaway. I chose NYX because it is a high quality brand that is not always the most accessible. They are sold at certain beauty shops and ULTA stores. I don't know if it is just me, but there are no ULTA stores in my area, so I never get a chance to shop NYX! I thought that you guys may be in the same situation, so I wanted to provide you with something that you may not have the most access too. NONE OF THESE PRODUCTS HAVE BEEN OPENED NOR TOUCHED! You are getting brand new NYX favorites of mine. I hand picked these products!

How Do I Enter?
There are two ways to enter. If you follow both steps you will have two possible chances to win. I am using a site that will randomly pick the winner. I WILL CHECK to make sure you have followed the steps correctly.

Step 1: Follow this blog! You have to be a follower of THIS blog to have a chance of winning. This will count as one entry.
Step 2: Comment on THIS POST saying "enter me!"

Extra Entry:
Follow my Beautylish Account. Click the link down below.
http://www.beautylish.com/rebeccabeauty

I am not completely sure when I am ending the giveaway so stay tuned! If you win, there will be a post congratulating you. I will ask you then for your email and shipping address.


What Can I Win?
NYX Jumbo Pencil in "#609 French Fries"
NYX False Lashes in "#128 Nostalgia"
NYX Lip Smacking Fun Colors in "#597 Margarita" and "#620 Paris"

WOOHOO


Good luck to you guys! Thanks for everything!

The Dangers of Blow Drying Your Hair...

RIP HAIR

I am pained as I write this. I thought I should tell you guys because I would be just as sad if the same thing happened to you. This is what I get for buying a crappy blow dryer. Basically, when drying your hair, watch the heat status and do not put it directly to your hair. For some reason when I used my Revlon blow dryer directly on my hair just like the salon people do, it started to burn off. I was mortified seeing a chunk of hair fall off and turning white. It's completely disgusting and the smell is impossible to get rid of. Because of this scary experience, I wanted to come up with ways to form a slight resolution if this ever happens to you. 

1.  Put on deep mask immediately. Even though a small portion of hair was visibly affected, other parts will still be burned. The deep mask will restore the condition of your hair. These masks are great:


Macadamia Natural Oil Deep Repair Masque ($30)
Neutrogena Triple Moisture Deep Recovery Hair Mask ($7.50)
Moroccanoil Restorative Hair Mask ($30-50)

2. Try and clip the dead ends or get a haircut. When your hair breaks off, it leaves the ends frayed and split. Leaving it will put your hair in an unhealthy state. Taking some hair cutting scissors and just clipping the very end of the split tip will help dramatically.

3. Slather some hair oil, serum, or leave in conditioner on. This will be very hydrating. Apply a little more than you would usually use for extra moisture. I love these ones.


Aussie Hair Insurance Leave-In Conditioner ($2-4)
MoroccanOil Oil Treatment ($40)
Coconut Oil

Hope this was helpful! If this ever happens, keep calm. Your hair will eventually grow back. If you liked this post please follow! Thanks guys.

"Aqua Metals"- An Eyeshadow Tutorial


Hey guys! Since summer is almost over and the bright colors are starting to go out of trend, I wanted to hurry and make one more bright eye tutorial before the season of fall comes! This is more of a toned down aqua blue tutorial. I used an electric blue color as the base but then added a cooler smokier effect by using a navy color in the crease. Keep reading for steps on how to recreate this eyeshadow look! Thanks <3

Products Used:
-NYX Jumbo Eye Pencils in "Electric Blue" and "Milk"
- Stila bright baby blue eyeshadow (no name)
- Inglot Matte Eyeshadow #389
-NYX False Eyelashes and DUO Lash Glue

Directions:

Step 1: Apply NYX Jumbo Eye Pencil in "Electric Blue" or any blue base you own onto your lids. Blend the edges softly. 
Step 2: Take a flat shader brush and pat any blue eyeshadow onto your base to set it! I used one by Stila from an old palette. 
Step 3: With a matte navy blue eyeshadow, slowly blend into your outer corner and crease. This will tone down the blue and add a cooler effect to the eyeshadow! Using a darker color in these areas add dimension to your eye and gives a more defined look.
Step 4: Take your NYX Jumbo Eye Pencil in "Milk" or any white base and apply it to your inner corner and brow bone. White brightens your eyes and gives a nice lift! I applied some onto my waterline as well to make the whites of my eyes appear whiter. 
Step 5: Apply your false lashes. Blend with mascara! Finished!

I hope you thought this simple tutorial was helpful! Tell me how it works for you! Thanks for reading and for all of your support. Stay tuned for more tutorials and posts! Love you guys <3


8.17.2011

THANK YOUUUU!!!


YAY! I reached 100 follows! Thank you so much for your support. I can't believe how quickly the blog's success is growing. I look forward to each and every blogging day with you guys! 100 followers is a milestone, and I can't wait for it to grow. Now I know I promised a giveaway, and I plan to go through with it! I have already bought the stuff. A post with all the rules and regulations will be up within 2 days or so. Just a little hint because I cannot wait, its a NYX giveaway! I love love love NYX. I thought it would be something great to give away because it is such a great brand but not sold at local drugstores. This would be your chance to get a taste of NYX! Thank you so much again, I love you guys with all my heart. Your support is amazing! If you have any requests or suggestions below, tell me in the comments section! And don't forget to FOLLOW! Thank you <3

DIY: Chamomile and Cucumber Eye De-Puffer

Hello beauties! In this post I am sharing a recipe on how to de-puff under eye circles! If you are lacking beauty rest and constantly on the go, your eyes can get puffy and form dark circles. This chamomile and cucumber treatment will leave your eyes feeling and looking refreshed!


What You Need:
-Two Chamomile Tea Bags
-Cucumber Slices
-Hot Water
-A Fridge/Freezer

Directions:
Boil a cup of hot water. Soak your tea bags for 30 seconds. Then take your tea bag to the fridge and allow it to cool. You can drink the tea you made! Chamomile has plenty of antioxidants and calming properties that allow you to relax. Once the tea bags are cool, place onto your eyelids for 10 minutes. They should be completely chilled. The chamomile and temperature of the tea bags will calm the swelling of your puffy under eye circles. If your tea bag has caffeine in it, it will further brighten your under eye area. Once finished, apply the cool cucumber onto your lids for another ten minutes. After completing these steps, your eyes should feel refreshed and awake! I hope this was helpful! Good luck.


THANK YOU SO MUCH FOR READING! I really hope this works for your eyes! Thank you so much for all of your support. I cannot believe how quickly this blog is growing. Love you guys so much! If you enjoyed this DIY, stay tuned and follow for more! They come out every 3 weeks or so! 

8.16.2011

How To: Applying Blush

Check out my "How To" posts on:
Bronzing Tips!
Highlighting 101

Hey everyone! This is a "How To" post on all things blush! Blush is one of my favorite makeup products. I try to wear it everyday! It brightens up any complexion and gives a lovely "flush" that is hard to achieve naturally without running around the block first. Keep reading for tips and a diagram of where to apply it for different effects! Thanks <3

Frequently Asked Questions

What is blush?
Blush is a product in the form of cream, liquid, or powder. It normally is tinted pink, peach, or red. People normally use blush on their cheek area. Blush is used to give a flush to one's face as well as brighten any complexion.

Where should I apply my blush?
Plenty of people think that blush should just be applied all over your cheeks. They are wrong! Small details to think of when applying blush can totally change the way your makeup is viewed upon. Down below are diagrams that I made of where to apply!

What blush is right for my skin tone?
Some blushes look better on some people than others. Just because it looks great in the pan does not mean it will blend well with your skin.
Pale Skin Tone- a lot of blushes fit this shade of skin well! Baby pink blushes with a blue undertone look best with pale skin. Sheer washes of color make pale skin glow! To get a warmer effect, something peachier will work! Stay away from dark pink colors because it can overpower your face.
Medium Skin Tone- Peachy pinks and corals are right for you! This coincides well with your skin color because it has a warmer undertone. A classic pink will still look great though. Medium skin tones tend to have more of a yellow undertone, so you want to make sure to find a blush that compliments your honey accents!
Dark Skin Tone- Everything goes well! The only issue is finding something pigmented enough to show up well on a dark skin tone! I love the look of purple blush on dark skin for some reason! One thing to be careful about is buying something too light. Extremely pale blushes can appear chalky and unhealthy on a dark skin tone, so aim for a deeper blush color when purchasing one.

Where Should I Apply Blush?
The common place is on "the apples of your cheeks." While that looks great, people have been mistakenly applying it right on the center of their cheek! Read below for tips on where to apply for your best results.


Apples Of Your Cheeks

Applying any type of blush right smack dab on the apples of your cheeks creates the illusion of a fuller and rounder face. It can sometimes look pudgy if done wrong. Blush on the apples of your cheeks gives a "sweet" and "youthful" appearance. With it applied this way, it will not contour your face and features. Wearing this gives a very innocent, lovely, and feminine feel to your makeup look!


Slightly Under Your Cheek Bone


This is my favorite technique to use when apply blush. Sweeping this blush under your cheekbones all the way to your hairline gives an edgier look. Bringing the blush all the way up to your hair line provides a lift that makes your cheekbones stick out! (in a good way...) A harsher jaw bone and intense cheekbones has a more sophisticated feel that looks beautiful and elegant.


CLICK HERE FOR MY FAVORITE BLUSHES!

I really hope you thought this post was helpful! Thank you so much for reading! If you liked this post please follow and comment below! Any "How To" posts you would like me to write about? Tell me! Thanks for your generous amount of support. I love every single one of you <3

8.15.2011

BACK TO SCHOOL SERIES- Essential #3: Picture Perfect FACE Makeup

Click on the links below for the other posts in this series!
"Back To School" Hair
"Back To School" Backpacks

Hi!! If you have not had your picture day yet, this is the post for you! In this post there are some great tips and product to take advantage of for a perfect yearbook picture. This is a full faced post but you can edit certain parts to emphasize your own features!

Face Makeup


Foundation-Concealer-Primer
Normally, high school students wear a full coverage foundation for picture day, but this year I am only going to spot treat certain problem areas with my concealer! If you are not comfortable with your skin, using full coverage foundation works well too. Wearing a primer is recommended because it allows a smoother application of your face makeup. Having a "flawless" face is essential for picture day! Here are some products I recommend:


Powder
A matte face is extremely important. If you have oily skin, powder your face right before you take your picture! The flash and excessive lighting in the picture room can make you appear shiny, so skip a translucent powder and go all the way with a matting powder or powder foundation. Here are some great powder options!


Blush-Bronzer
Blush and Bronzer can make your picture perfect or bring it down. That is why it is important to go natural and safe! Putting on a bright pink blush may look good in person, but in the picture it can be emphasized to the point of looking like a clown! A blush with peachy undertones give a natural flush which looks beautiful on camera. Skipping a shimmery blush is recommended too. The camera really picks up the sparkle and you do not want to look like you have glitter all over your face! As for bronzer, I am a huge fan of contouring for picture day. A matte bronzer is amazing for defining cheek bones and jaw lines! If you own a matte bronzer, use it! I love these blushes and bronzers.


REMINDER!!!! Giveaway!

Hey guys...Today was a monumental day for this blog haha! I am featured on Beautylish which is a dream come true :) Since I am getting quite a few more views today, I am going to advertise once again that I am going to do a giveaway IF I get 100 follows by September 5th! Now I hope you realize that 100 entries is not that much and your chances of your winning is HUGE. So please support and you may win an awesome prize! Sorry to keep advertising this but I really want to give away some special to all my wonderful followers. Thanks guys <3

Jeffrey Campbell Shoes!!!

Heyyyy guys! I just bought these amazing heels today and I couldn't wait to show you guys! Let's just be honest, they are absolutely fabulous. They are nothing that I would usually buy, and I have no idea how I am going to style them... BUT, I love them so much and I am so happy I bought them. They are completely crazy and "out there," but WHO CARES!

and... apparently this exact pair is super rare and hard to find. I got them at a local store and they were on sale for around $80 so I jumped on the deal. They have similar ones that are normal leather on UrbanOutfitters.com. Yay!


By Jeffrey Campbell 
$198


Tell me what you guys think in the comments down below! Thank you so much for reading! Love you guys! If you have any suggestions on how to style these masterpieces, please tell me <3

Reminder... 100 follows by Sept 5 = awesome giveaway!

8.13.2011

Review: MAC's Creme Cup Lipstick {Swatches and Photos}

Hey guys! I recently bought a cult favorite... MAC's Creme Cup Lipstick! It is a creamy baby pink color and it is absolutely great. Keep reading for swatches, reviews, and photos! Love you guys :)


MAC's "Creme Cup" Lipstick
Net Weight: 0.1 OZ
Company: MAC
Where to buy: MAC Store, Bloomingdales
Price: $14.50
Type: Cremesheen


**Just a side note...When I apply lipstick, I ALWAYS use a lip balm or treatment before I apply it because it smoothes out my chapped lips and gives a better base for the lipstick to stick onto!!**

Formula: Very creamy! I have extremely dry lips, but this doesn't look horrible like every other light pink lipstick does, so it must be special! Lightly colored lipsticks can appear chalky and washed out, but Creme Cup looks very nice! It is a milky pink and very girly. It has a natural dewy sheen which looks beautiful with winged eyeliner. 
Packaging: Nothing special, just like any other MAC lipstick. For some reason I do not like the packaging, it looks like a bullet to me. I prefer shiny gorgeous packaging like YSL's or Dior's. 
Longevity: No matter what I do, lipstick does not last more than 30 minutes on my lips. This lipstick does wear off quickly. I am partially at fault because I usually rub my lips together a lot and eat all the time!


I hope you guys liked this quick review! Please follow!! Thanks so much for reading and for your support! Comment below what you think of Creme Cup :)